
A backsplash is a practical necessity and enhances beauty wherever installed. This backsplash installation how-to guide gives the details on installing tile and tile sheet backsplashes. Both are available in a wide range of colors, patterns and textures. As with most home-improvement projects, it’s a good idea to hire a professional if you’re not comfortable doing the work yourself.

Preparation for Backsplash Installation
Gathering the tools and materials ahead of time while getting a solid overview of the project reduces hassle and helps ensure a quality job once you get started. This is a good rule of thumb, both when looking at how to install a backsplash, or practically any home improvement job. The old adage of “measure twice, cut once” is very good advice.
With that in mind, here’s what you’ll need to successfully complete a tile backsplash installation.
Tools for backsplash installation:
- Tape measure
- Level
- Straight edge
- Notched trowel
- Tile float
- 5-gal. bucket & sponge
- Tile cutter
- Utility knife
- Power drill
- Mixing paddle
Materials for backsplash installation
- Wall tile (purchase all boxes from the same run, if possible) (coming soon to our store!)
- Mortar (ask the retailer which mortar is right for the tile you select)
- Sealer
- Grout (choose a product formulated for the type of tile you’re installing)
- Tile adhesive
- Cheesecloth
Steps to Successful Tile Backsplash Installation
Here are the steps required for DIY backsplash installation that looks like a pro did it. It might help to read through all of the steps before you begin work on the project.
Step One: Measure to Determine How Much Tile is Needed
You’re looking for square footage here. As you measure, divide the wall up into rectangles, and measure height and width and multiply. Add all the rectangle sums together. Next, add 10 to 15 percent extra to account for mistakes or small gaps you overlooked. The surplus also provides extra tiles for spares in case tiles or sections are damaged down the road.
Step Two: Prepare the Area You’ll Be Working In
A cluttered room slows down the job and creates the potential for mistakes. Clear off all the countertops, remove light switch and outlet covers, unplug the range and move it out of the way.
Next, cover the countertops with protective materials such as cardboard or a heavy tarp. Use tape to protect cabinets, countertops, existing backsplash, etc. just as you would if you were preparing to paint the surface instead of tile it.
Finally, turn off electrical circuits to the light switches and outlets you’ll be working around in order to avoid the possibility of getting shocked. Safety first!
Step Three: Prepare the Wall for Backsplash Installation
Wall prep is very important. The wall surface must be free of damage, so patch holes and fill nicks, deep scratches and indents with spackle. Sand repairs lightly. Imperfections in the wall can show up later by making tile uneven, so take the time needed to get this step right. Here are a few more helpful hints for wall preparation:
- Gloss and semi-gloss surfaces need to be sanded
- Less glossy surfaces should be scrubbed lightly with tri-sodium phosphate solution (see label for directions)
- All walls must be free of dirt, oil and sanding debris, so wash them with mild detergent and rinse thoroughly with water
- Very greasy walls, perhaps behind the range, should be degreased or primed with a product designed to cover stains and grease
- Allow walls to dry before installing tile
Step Four: Pre-fit the Tile
Select the most visible area to be covered – the focal point. This is usually the largest section of wall to be covered. These tips will help with this step:
- The area behind the range or behind the sink is typically the kitchen’s focal point
- In a bathroom or laundry room, the focal point is typically over the sink or over significant appliances or fixtures
- Start at the low point, in the center of the main focal area
- Use spacers to get proper spacing of the tile
- Cut tiles or tile sheets where necessary to fit corners
- A tile cutter is ideal for straight cuts, a nip works for rounding tiles and a wet saw is necessary for natural stone tile
- A utility knife is the best way to cut the mesh holding tiles in a sheet of tiles
- When installing single tiles, mix up tiles from several boxes to create a better blend, even if all the tiles are the same color
- Gaps of less than one inch where the wall meets the cabinets or ceiling can be filled with cut tile or covered with trim
- Place the tiles on the countertop for installing later
Step Five: Mix the Mortar
You’ve got pre-mixed and powder options. Pre-mixed tile mortar is a good choice for light, small tiles. For heavier tile, a powdered thinset mortar will hold more securely.
Follow the directions on the package for mixing powder thinset. A drill and mixing paddle will make the job go faster and more thoroughly mix the mortar.
Step Six: Apply Mortar to the Wall
Holding the notched trowel at a 45-degree angle, apply a thin layer of thinset using the flat side of the trowel to cover the surface completely. Cover a section roughly three feet square if working with tile sheets or two feet square if working with individual tiles to prevent the mortar from drying out before tile is installed. Start with an even smaller section if installing tiles less than four inches square.
Next, apply a second layer of thinset using the notched side. Comb through the thinset side to side with the notched trowel to create ridges.
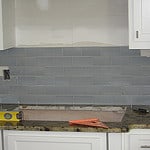
Step Seven: Install the Tile
These tips for wall tile installation will help ensure your success on this project:
- Whether using single tiles or mosaic sheets, install the first tile or section in the center of the main focal area using a level to make it straight, if needed
- Slightly rotate the piece while pushing it down in order to flatten the combed ridges of thinset, and use spacers to allow the proper amount of space between tiles for the grout
- Use this method – adding mortar to small areas and setting tile – to install tile over the entire area to be covered by the backsplash
- Remove thinset from the surface of any tile before it hardens
- Use the tile float to gently press the tile into the mortar
- Once all the tiles are installed, allow the mortar to dry completely, a process which usually takes at least eight hours and should be complete within 24 hours
- When the mortar is dry, wipe the tiles with a rag dampened with warm water
NOTE: If installing natural stone tile, the tile must be sealed before grouting in order to protect it from being stained by the grout
Step Eight: Mix the Grout
Carefully follow instructions on the package. The best strategy is to add water to the bucket first and then pour the powder. This helps prevent the grout from clumping on the sides of the bucket. Most grout should be allowed to stand for five to ten minutes after mixing. Once you start adding grout to the tile, the grout should be mixed every 15 to 20 minutes to maintain consistency.
Pre-mixed grout is also available. Talk to your tile retailer to find the best product for your project.
Note: You’ll have about two hours to use the prepared grout, so mix a relatively small batch the first time.
Step Nine: Apply the Grout
These tips for grouting tile on a backsplash will help you succeed on this challenging DIY project:
- Hold the grout float at a 45-degree angle and apply the grout generously, being sure to fill all spaces between tiles
- The fastest and most effective technique is to smear grout over the entire tile field, and you don’t have to be careful to just grout in the spaces
- Some installers use a rounded dowel to shape the grout between the tiles which gives it a slightly recessed appearance
- Use the grout float to wipe off the excess grout without being too aggressive because the excess can be removed with a damp, clean sponge later
- When sponging off the tile surface, don’t use so much water that it washes grout out from between tiles, but rather go over the tile two or three times with less water
Note: When the grout has had several hours to dry, you can remove any existing grout haze on the tile surface with cheesecloth and warm water. Again, be careful not to damage the grout between the tiles.
Step Ten: Seal the Tile and Add Caulk and Trim
One to three days later, the grout will be fully dry. Follow the directions on the sealer container for best results. The sealer will prevent staining of the grout and tile. It is an important final step in a successful DIY tile backsplash job.
It makes sense to add a bead of latex caulk to the seam where your newly installed tile meets the countertop or an existing backsplash. If desired, you can also add trim to cover any gaps between the tile and the cabinets or ceiling.